Batch - Document Settings
Last Updated: Version R2510Document settings are applied within a Batch Type for both AI Extraction or Manual Indexing. However, for AI Extraction, document fields will be selected based on the AI model chosen. For Manual Indexing, you must hand-select document fields. Otherwise, the Document Settings are the same for AI Extraction and Manual Indexing, as described below.
-
In the Create New Batch type screen, click +Add Document located under the 'Documents in this Batch' subheading.
-
From the drop-down list, select either Manual Indexing or AI Model.
-
If you select Manual Indexing, the Document Settings screen appears immediately and you can proceed to select options, using the details provided in the selections below.
-
If you selected AI Model, the Extraction AI Model list loads, and you can select a model from the list. Once your selection is made, the Document Settings screen loads, with the Document Fields populated from the model.
-
-
You have the option to change the document name field, if necessary. By default, the name matches the selected AI model.
-
Enable the Create Full Text Layer option if you want to generate a full text layer for each new page without requiring an extraction step. A new field appears allowing you to select an OCR AI Model. Note that only OCR models created in Add an AI Model to the Library are displayed in this list.
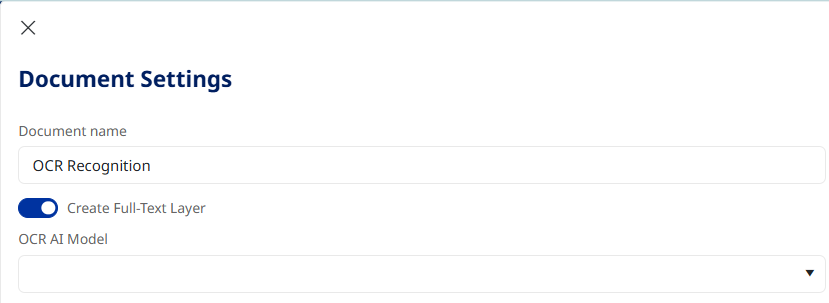
The full text layer is generated after submitting a new batch, and after submitting in the Review screen when pages are added or replaced. For duplicated pages, OCR results will be copied from the original.
-
Proceed to select options, and then click OK once finished.
SLA
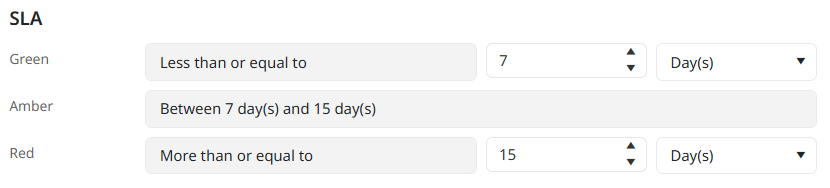
Choose the Service Level Agreement assignments. You can set Green, Amber, and Red thresholds, using a combination of factors based on date and time.
For example, you might set a Green threshold if the SLA is Less than or equal to 7 days, Amber if between 7 and 14 days, and Red if more than or equal to 15 days. These settings are shown below.
Notifications
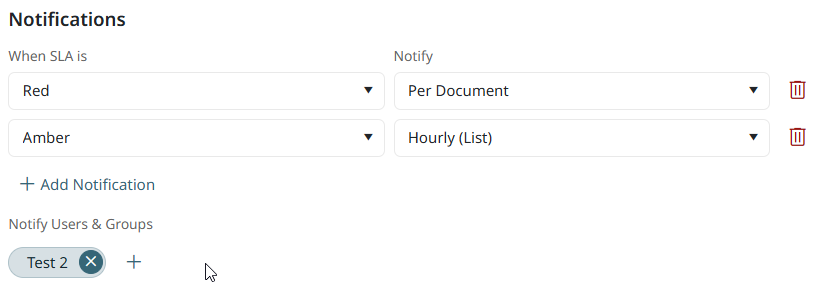
Notifications are based on the SLA thresholds set above. If an SLA is in a particular state, the system will send notifications to either specific users or a user group. You can either notify the user/group hourly (with a list of all documents that are within the specific SLA threshold) or per Document.
-
Per Document: Within the notification email, the user can click on the link to proceed directly to the Batch screen that includes the specific document.
-
Hourly (list): Within the notification email, the links redirects the user to the Work Queue screen and filters for all batches mentioned in the description.
In the example below, notifications will be sent to the selected User Group each time a document hits the Red threshold, and Hourly if Amber is reached. No notifications will be sent for documents within the Green SLA theshold. If Amber is set to Hourly, then the SLA notification is sent at the beginning of the next hour. If Amber is set to Per Document, then the SLA notification is sent immediately.
Reject Reasons
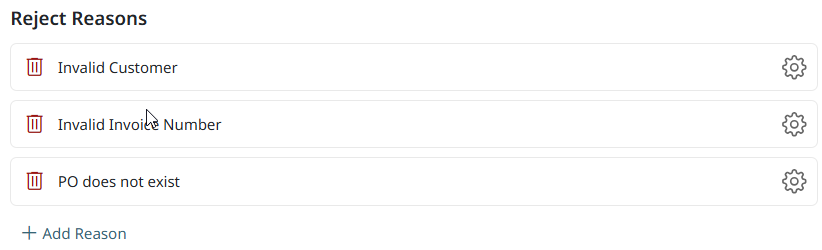
If there are clear reasons why the document could be rejected, you can establish the reasons here. Click +Add Reason, and then enter a Reason name and description.
Document Fields
The Document Fields are already populated if you selected an AI model. However you can click Edit Layout if you need to adjust the fields.
If you selected Manual Indexing, you can add the fields one at a time. Click +Add field, and then modify the settings:
| Field | Description |
|---|---|
| Display Name | The display name for this document field. |
| Required | When set to Required, this field must be completed before a batch can be submitted. If set to Optional, the Operator does not need to complete the field. If set to Hidden, the field will not be visible to the Operator. Hidden is used in cases where this field is typically populated by a business rule and used for routing or export purposes. |
| Field Name | By default, the field name is duplicated from the Display name. However, if you enable the Field Name option, you can enter a specific field name that differs from the Display name. |
|
Data Confirmation |
Enable to ensure the Operator confirms this field manually. |
|
Double blind Keying |
This setting works in combination with a data confirmation task and hides the value entered in validation. The confirmation operator keys in the value and, on enter, the value is compared to what was during the validation task. If the values match, no further action is needed. However, if the values do not match, a message is displayed during the confirmation step and the Operator must confirm or correct teh value entered. |
|
Redact field |
Enable Redact to black out the field and ensure the details are not visible to the Operator. Use this feature to block proprietary information. |
|
Always valid |
Forces a field to be validated, even if empty. |
|
Confidence threshold |
Enter the confidence percentage. The AI extraction returns a confidence value of how certain it is the value is correct. The threshold allows the Designer to set when the value should be flagged for the Operator. For example, if the AI model returns 85% confidence and the threshold is set at 90%, the field is in red requiring the operator to validate. If the confidence was set at 80%, the value would not require validation. |
| Data type | Choose the type of data that this field will use: Text, Integer, Decimal, Currency, Boolean, Date time, Date, Time, List. |
| Format | Choose the format that corresponds to the Data Type you selected. This field is only available if the Data type field requires a format selection. |
| Default value | Depending on the Data Type and Format selected, choose an option from the list. For example, if you selected Boolean as the Data type, you can select either True or False as the Default value. |
| Min length |
Set the minimum length for this field, depending on the type of field.
|
| Max length |
Set the maximum length for this field, depending on the type of field.
|
|
Default Value |
Enable this setting to ensure that batch/document fields (including both required and optional fields) receive values from the input data source (see row below). If the data source does not provide a value for a field, the system will automatically use a predefined default value. The system prioritizes using the value from the data source; the default value is only used when the data source does not supply a value. If a batch/document field is of List datatype, only values included in the pre-defined List are accepted from the data source. If the data source provides a value not present in the defined List, the system does not use it and will use the default value if available. Also note that the system cannot use a Datasource that returns a table with different columns from those defined in the document field. |
|
Data Source |
Select either Manual Entry or Auto Entry:
|
|
Data source value |
If Auto Entry was selected for the Data source, select a system value, global variable, batch variable, or batch business rule that the AI model will use as the data source. |
|
Read-only |
Enable this option if the field is populated by a Business Rule and does not require Operator input. |
|
Expressions |
If the value must match a specific format, you can create an expression. For example, if a PO number must start with AL, following by 6 digits, and ending with the letter m or x, the resulting expression would look as follows: Expression: ^AL\d{6}[mx]$ |
Document Variables
Click +Add variable to create variables that can be specifically used for this Document Type.
-
System Variables: Options generated by the system are Created by, Created date, Last modified by, and Last modified date.
-
User Defined Variables: Define a custom variable. Enter a variable name, choose the type and then enter the default value for this variable. Click the gear symbol to add values if the type is List.
Document Business Rules
Business rules allow you to apply calculations and logic to specific data fields within this Document Type.
| Rule | Example |
|---|---|
| Calculate Value | Perform a calculation. If a PO has been issued for $20K, and the current invoice amount is $12K, can the invoice be paid? |
| Calculate Duration Between Dates | Compare the invoice date to net payment terms. If the invoice date is June 1, the current date is July 30, and the net payment terms are 45 days, does the current date necessitate payment? |
| Convert Value | Convert an identified value from one format to another. You can select a System Value, Batch Field, Global or Batch Variable that you want to convert to a new value. If the date field appears on the document as yyyy/mm/dd, but the format required in the database is mm/dd/yyyy, use this rule to convert the value. |
| Execute Regular Expression | If the rule must specifically match a particular format, create an expression. You can have the rule Check, Match, Replace, Extract, Split based on if the expression terms are met. |
| Modify String | Use this option to modify existing information. The source can be a System Value, Global Variable, Batch Field, Batch Variable, Batch Business Rule, Document Field, Document Variable, or Parameter. For example, you may need to extract the first characters of an invoice number, or replace a string of values. |
|
Set Variable |
Set a Batch variable. |
|
Set Field |
Set a Batch field. |
Stamping
Stamping allows you to add information to the document. You can simply enter text that will appear as the stamp, or you can choose from a System Value, Global Variable, Batch Field, Batch Variable, Batch Business Rule, Document Field, Document Variable or Document Business Rule. You can combine these values to establish the stamp.
By default, the stamp will appear in the top right of the document. However, the setting can be modified to Top, Mid, Bottom and Left or Right. In addition, the stamp ca be rotated horizontal or vertical.